Showing posts with label arts and crafts. Show all posts

Wednesday, December 23, 2020

It's Water-Wise Wednesday with Frannie the Fish! {Upcycled Olaf Ornament with Bottle Caps}

 Why Upcycling?

Want to learn why Frannie is doing an upcycling project this week? Check out the Upcycled Clothing Pin Snowflake Ornament blog here.

This Week's Project:
Bottle Cap Olaf Ornament

Frannie found some old bottle caps sitting in her desk, and she decided to upcycle them into her favorite Frozen snowman: Olaf!


Materials:
  • 3 bottle caps
  • scissors
  • white paint
  • white, black, and orange construction paper or foam sheets
  • hot glue gun
  • string or ribbon
  • 2 small sticks (can be collected for free outside!)
  • 2 small, white pom-poms

Instructions:

  1. Collect 3 bottle caps. 
  2. Paint the bottle caps white. This may take several layers of paint. Allow them to dry completely before moving on to the next step.
     
  3. Glue the three bottle caps together using a hot glue gun. It might be helpful to ask an adult for assistance when using the hot glue gun. For extra support, glue a piece of string across the back of all three bottle caps. 
  4. Add the stick arms, buttons, and pom-pom feet using the glue gun. If you don't have black buttons, you can use black construction paper.
  5. Using the scissors, cut out the elements of Olaf's face: mouth (with large front teeth), carrot nose, eyes, and eyebrows. Glue these elements to the top bottle cap.
  6. Finish your Olaf ornament by gluing a looped piece of string to the back of the top bottle cap. Congratulations! You have just made an Upcycled Bottle Cap Olaf Ornament! 
For More Fun:

Make a snowman family! Using different items you find around the house (buttons, scraps of yarn or fabric, craft supplies such as glitter, etc.) make some friends for Olaf. Get creative and have fun!

Share: 

Share pictures of your family and your snowmen with us on FacebookTwitterInstagram, or by sending them in to info@groundwater.org. Happy Holidays!

Wednesday, December 9, 2020

It's Water-Wise Wednesdays with Frannie the Fish! {Upcycled Clothes Pin Snowflake Ornament}

Tis the season for repurposed or upcycled decorations! Frannie loves upcycling because it takes something that would normally be thrown away and makes it new and usable again. Upcycling is a great way to reduce our waste and conserve water! 

How does upcycling reduce waste and conserve water? 

Upcycling reduces the need to use new, raw materials when making a new product. By using old materials instead of new materials, less energy and water is used. Even better, air pollution and water pollution are reduced!

Upcycled Clothing Pin Snowflake Ornament:


Frannie was looking through her home for fun items to upcycle when she came across some broken clothing pins. With some creativity (and the help of Pinterest), Frannie decided to make a snowflake ornament out of her broken clothing pins!

What You Need:

  • 8 clothing pins (or 16 halves of clothing pins)
  • white paint
  • paint brush
  • glue
  • string
Instructions:
  1. Gather together your 8 clothing pins. You'll need both halves of each clothing pin for a total of 16 pieces. 
  2. Paint each clothing pin white. 
  3. Glue the clothing pin halves together as shown in the photo. You should end up with 8 snowflake pieces. Thread a string through the hole in one piece. 
  4. Glue four snowflake pieces together into a "+" shape as shown in the photo. 
  5. Glue the final four snowflake pieces into the corners of the already glued pieces, making sure the snowflake piece with the string is located where you would like the "top" of your snowflake to be. 
  6. Congratulations! You have just made an Upcycled Clothing Pin Snowflake Ornament! Hang it up as a winter decoration or wrap it up to give as a gift.
For More Fun:

Get creative! Add color to your snowflake or a touch of glitter. Write a special message on it or have all your family sign their names on it. Have fun!

Share:

Share pictures of your family and your snowflakes with us on Facebook, Twitter, Instagram, or by sending them in to info@groundwater.org. Happy Holidays!

Wednesday, October 28, 2020

It's Water-Wise Wednesdays with Frannie the Fish! {Upcycled Halloween Spider}

Halloween is THIS WEEKEND! Frannie will be practicing social distancing, staying home instead of trick-or-treating with her friends, but she's still full of Halloween spirit! Frannie found a fun activity you can do, too - making a spooky, upcycled spider!


Here's what you need:
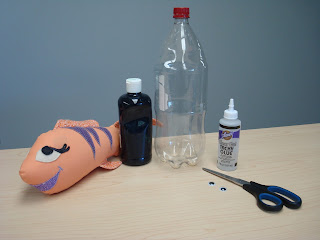
  • 2-liter plastic bottle
  • Black acrylic paint
  • Scissors
  • Glue
  • Googly eyes

What to do:
1. Clean out a 2-liter plastic bottle and remove labeling.


2. Pour black paint in the bottle, screw cap on, and shake the bottle until black paint has coated the entire bottle. This may be messy, so make sure the cap is on tight! When you're done, pour the excess paint out.


3. Let the paint dry overnight.

4. Cut the top of the bottle off and recycle.

5. Make legs for the spider by cutting the bottom of the bottle into 8 strips.


6. Bend the legs outward at the base of each strip.


7. Bend the legs inward about halfway down each strip.


8. Bend the legs inward again at the end of each strip.


9. Glue the googly eyes on your spider.


10. Decorate your house with your spooky spider!


Frannie wishes you a safe and fun Halloween!

Wednesday, May 13, 2020

It's Water-Wise Wednesdays with Frannie the Fish! {Upcycled Conservation Flowers}

Hooray! It's finally May! That means we've finally reached the time of year where the flowers, bushes, and trees are coming to life in beautiful and vibrant colors. This year, try planting some Upcycled Conservation Flowers to remind you of all the ways you can conserve water.
But wait a minute, Frannie: what in the world are Upcycled Conservation Flowers?
Upcycling is a fun trend that helps protect the environment by reusing items that may have previously been thrown away. Reusing an item keeps it from ending up in a landfill where it may take millions of years to decompose. Upcycled Conservation Flowers are made out of plastic water bottles and each petal represents an easy way to help conserve and protect groundwater! 
Find out how to make them below!
Students showing off their Upcycled Conservation Flowers!

Materials:

  • Empty plastic water bottle
  • 8 different colored acrylic paints
  • Paint brush
  • Hole punch
  • String
  • Wood stick (optional)
  • Glue
  • Sequins, beads, paper, glitter, or gems


Instructions:

  1. Clean your plastic water bottle. Remove any plastic labeling from the outside.
  2. Cut your water bottle in half. Recycle the bottom half of your bottle.
  3. Cut eight petals by cutting from the middle of the bottle towards the cap. Make sure to cut all the way to the edge of the cap. Round the edges.
  4. Press the petals out and flatten them to make your bottle look like a flower.
  5. Paint each petal a different color to represent the different ways to protect and conserve groundwater. Add glitter for fun!
  6. Cover the cap with beads, gems, sequins, paper, or paint to represent the pistil/stamen.
  7. Use a paper hole punch and string to make your flower an ornament or use a wooden stick and glue to create a decorative flower for potted plants.


Ways to Protect and Conserve Groundwater:

Go Native
Use native plants in your landscape. They look great, and don't need much water or fertilizer.
Reduce Chemical Use
Use fewer chemicals around your home and yard, and make sure to dispose of them properly - don't dump them on the ground!
Don't Let It Run
Shut off the water when brushing your teeth, and don't let it run while waiting for it to get cold. Keep a pitcher of cold water in the fridge instead!
Fix the Drips
Check all the faucets, fixtures, toilets, and taps for leaks and fix them right away.
Shower Smarter
Limit yourself to just a five minute shower, and challenge your family members to do the same!
Water Wisely
Water plants during the coolest parts of the day and only when they truly need it. Make sure you, your family and neighbors obey any watering restrictions.
Reduce, Reuse, and Recycle
Reduce the amount of "stuff" you use and reuse what you can. Recycle paper, plastic, cardboard, glass, aluminum, and other materials.
Learn More!
Get involved in water education! Learn more about groundwater by checking out The Groundwater Foundation's website www.groundwater.org/get-informed/.

Wednesday, April 29, 2020

It's Water-Wise Wednesdays with Frannie the Fish! {Make Your Own Rain Gauge!}

April showers bring May flowers and it's certainly been sprinkling around Frannie's pond! Rain gauges are an excellent way to measure how much precipitation your outdoor plants are receiving and help save you money so you only water your lawn and garden when needed.

Here's how you can make your own. To start, you'll need:
  • A plastic bottle with a flat bottom
  • Scissors 
  • A ruler
  • A permanent marker
  • Stickers (optional)

Here's what you do:
1. Begin by removing all the labeling and cleaning the plastic bottle.


2. Take the scissors and the cut off approximately the top third of the bottle.


3. Flip the top third of the bottle upside down and insert it into the plastic bottle.


4. Using the ruler, mark 1/4", 1/2", and 1" increments starting from the bottom of the plastic bottle. For more fun, use stickers and markers to decorate your rain gauge.


5. Place your rain gauge outside. You can use twine to tie it to a post, bury it, or use another method to ensure it stays upright.


6. Check your rain gauge after a storm to see how much rain has fallen.

Take a picture of your rain gauge and share it with Frannie at hydro@groundwater.org!

Wednesday, November 27, 2019

It's Water-Wise Wednesdays with Frannie the Fish! {What-A-Cycle!}

See below for a special announcement!
***
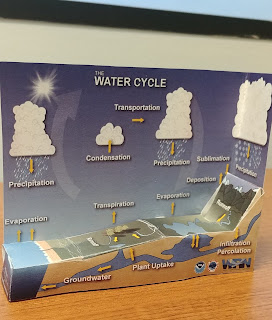
A week ago, Frannie was in Cincinnati meeting with science educators and curriculum developers for the National Science Teaching Association regional conference. While she was there she met Dennis, a climate scientist from National Oceanic and Atmospheric Administration (NOAA), who was handing out a water cycle modeling activity called "What-A-Cycle"!

Frannie thought the idea was so clever but she knew she wouldn't have the time do it because she had to get ready for Groundwater Week. She reached out to her friends at the Groundwater Foundation, knowing we'd be excited to share this craft with you today.


WHAT-A-CYCLE Water Cycle Paper Craft
You'll need:


STEPS:
1. If you printed out a Black and White copy or an unlabeled copy of the What-a-cycle paper craft worksheet, you should first color it and label all the parts of the water cycle.

2. Cut out the atmospheric portion of the water cycle and then cut out the ground portion of the water cycle. You should now have 2 separate pieces.

3. Fold the lettered tabs and along the marked lines on the ground piece and start to form a 3-D version of the groundwater and runoff portions of the water cycle. Once you start to see how the flat version transforms into 3-D, glue or tape the tabs together to form the model.

4. Fold along the dotted line in the atmospheric portion of the water cycle so that the largest precipitation cloud is at a right angle to the rest of the background.

5. Glue or tape the 3-D groundwater portion of the model to the atmospheric section of the model to complete the activity.


Frannie has been blogging about the water cycle a lot these past couple months.Go back to review her water cycle blogs first, and then trace as many paths a water droplet can take as you can find. What parts of the water cycle deep dives are shown in this model? What parts are missing?

Let her know by email or through Facebook, Twitter, or Instagram.

Special Announcement!!
Catch Frannie next week on Facebook in a very special addition of "Water-Wise Wednesdays" as she completes the Groundwater Foundation Scavenger Hunt in the Groundwater Week Exhibit Hall! Frannie is excited to introduce you to several companies who make it possible for her (and her friends at the Groundwater Foundation!) to share the importance of groundwater through education.

Wednesday, November 13, 2019

It's Water-Wise Wednesdays with Frannie the Fish! {Hydro Van Gogh}

Express your artistic side and follow a water drop's journey through the ground in a fun activity called Hydro Van Gogh! An aquifer is an underground geological formation of sand, soil, gravel, and rock able to store and yield water. The water from an aquifer is called groundwater and it is the water we drink and the water that grows our food. Find out more!

Here's what you need:
  • Aquifer map and/or an aquifer model
  • Canvas panels (recommended 5" x 7") or large sheets of paper
  • Oil pastels or acrylic paint 
  • Paint brushes

Here's what you do:
1. Identify the different parts of an aquifer using the graphic below:


2. Set out the canvas panel or a large sheet of paper, paint, and paintbrushes.

3. Now, pretend like you are a water drop that lands on the ground and seeps into an aquifer. Paint what you see as the water drop. Get as creative as you like!


Optional extra: continue to paint your journey through the water cycle.
What would you see?
How many different pathways through the water cycle will you take?
What kinds of materials will you interact with?

Be sure to share youmasterpiece at home with your family. Share what you know about groundwater and how to protect it!

Send pictures of your paintings to info@groundwater.org.   

Wednesday, October 30, 2019

It's Water-Wise Wednesdays with Frannie the Fish! {Water Inside Us}

Did you know that humans are made up of 60-70% water? Water helps blood flow easily, food digest in your body, and allows toxins to be filtered through your liver and kidneys before flushing them out as waste. People like you need to drink water and eat things with lots of water in them (like watermelon and strawberries and cucumbers and celery!) to keep our bodies happy and healthy.

Humans aren't the only living things made up of water - so are fish like Frannie! Fish, on average, have are made up of 78-85% water, just a little higher than humans.  Frannie has a fun activity you can do to illustrate just how much of your body contains water particles.

All you need is a few simple things:
  • A large piece of paper, big enough for you to lay down on
  • Markers/crayons/colored pencils
  • Scissors
  • A friend or family member to help
Steps:
  1. Set the large piece of paper on the ground and lay on top of it.
  2. Have your friend trace your outline onto the paper with a marker.
  3. Measure the total height of the outline and multiply by 0.70 in order to find the height of 70% of your body. If you don't have a ruler, you can estimate 70% of your body by dividing your outline into quarter and drawing a line a bit below the 3/4 mark.
  4. Using a blue marker or coloring utensil, color in 70% of your body.
  5. You can color in the remaining 30% of your body with another color or leave it blank.
  6. Cut out your outline and either hang it next to you on a wall or lay down beside it.

Look at how much of you contains water! It's in your bones, your blood, your skin, your belly, and even your eyes! Seeing how much of our bodies are made up of water helps us understand why always having a clean drinking water source is so important.

Wednesday, July 3, 2019

BLOG: Frannie's Upcycling for the 4th of July

Frannie the Fish loves looking for new ways to upcycle. Upcycling is when you take old, useless things and make them into something new. Upcycling helps protect our water supplies by reducing the amount of waste that gets into our landfills and prevents you from buying new products that take lots of water to make.

Since this week is the 4th of July, Frannie wanted to make some patriotic decorations. Her first stop was the recycling bin to see if she had any unwanted items she could use for her project. She found lots of used paper. She decided this paper would be perfect for making one cut stars!

She also found a few other things laying around the house to help her make the stars. Here's what you will need to make stars of your own:


  • Used paper, preferably with one clean side. 
  • A pen that is out of ink, or a broken mechanical pencil
  • Markers (for 4th of July you might want to use red and blue) 
  • Scissors 
  • Tape
  • Optional: Any other craft supplies you might have around the house 
  • Optional: Glue to glue the other craft supplies to your star

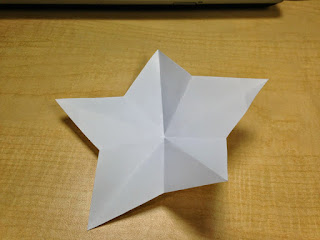
Start by making your your star. You can trace a star if you have a star stencil, OR you can use the one cut star method. To make a one cut star, use the directions below or checkout this video that gives a great explanation of how to make them!

1. Start with an 8.5" x 11" piece of used paper


 2. Fold it in half horizontally (the short way, not the long way)


3. Create horizontal and vertical creases by folding it in half again, unfolding it, and then folding it in half the vertically. Unfold it again so it is just folded in half once with creases going up and down, and side to side.


4. Starting at the vertical crease (the up and down one) fold the left top corner to the horizontal crease (the side to side crease).


5. Fold the same corner back so the top folded edge aligns along the fold you created in the last step.


6. Fold the upper right corner towards the left corner along the last fold you made.


7. Fold the right corner back until the top folded edge aligns with the edge from your last fold.


8. Now it’s time for your one cut. Cut at an angle (as shown) on the side with the smaller triangle.


The small piece that falls off is your star! Unfold it and you’re ready to decorate.


Decorate your star however you'd like. Frannie decided to do a flag theme. She colored the star and then put a few left over craft supplies on it to make it sparkle!


Finally, Frannie taped the used pen to the back of the star so she can hold it at the 4th of July parade!


Frannie doesn't want her new decoration to go to waste after the 4th of July, so she plans on using it as a plant decoration! Can you think of any other ways to use your new decoration around the house?


Have a safe and happy 4th of July!