Showing posts with label Upcycling. Show all posts

Wednesday, December 23, 2020

It's Water-Wise Wednesday with Frannie the Fish! {Upcycled Olaf Ornament with Bottle Caps}

 Why Upcycling?

Want to learn why Frannie is doing an upcycling project this week? Check out the Upcycled Clothing Pin Snowflake Ornament blog here.

This Week's Project:
Bottle Cap Olaf Ornament

Frannie found some old bottle caps sitting in her desk, and she decided to upcycle them into her favorite Frozen snowman: Olaf!


Materials:
  • 3 bottle caps
  • scissors
  • white paint
  • white, black, and orange construction paper or foam sheets
  • hot glue gun
  • string or ribbon
  • 2 small sticks (can be collected for free outside!)
  • 2 small, white pom-poms

Instructions:

  1. Collect 3 bottle caps. 
  2. Paint the bottle caps white. This may take several layers of paint. Allow them to dry completely before moving on to the next step.
     
  3. Glue the three bottle caps together using a hot glue gun. It might be helpful to ask an adult for assistance when using the hot glue gun. For extra support, glue a piece of string across the back of all three bottle caps. 
  4. Add the stick arms, buttons, and pom-pom feet using the glue gun. If you don't have black buttons, you can use black construction paper.
  5. Using the scissors, cut out the elements of Olaf's face: mouth (with large front teeth), carrot nose, eyes, and eyebrows. Glue these elements to the top bottle cap.
  6. Finish your Olaf ornament by gluing a looped piece of string to the back of the top bottle cap. Congratulations! You have just made an Upcycled Bottle Cap Olaf Ornament! 
For More Fun:

Make a snowman family! Using different items you find around the house (buttons, scraps of yarn or fabric, craft supplies such as glitter, etc.) make some friends for Olaf. Get creative and have fun!

Share: 

Share pictures of your family and your snowmen with us on FacebookTwitterInstagram, or by sending them in to info@groundwater.org. Happy Holidays!

Wednesday, October 28, 2020

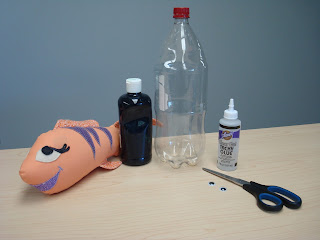
It's Water-Wise Wednesdays with Frannie the Fish! {Upcycled Halloween Spider}

Halloween is THIS WEEKEND! Frannie will be practicing social distancing, staying home instead of trick-or-treating with her friends, but she's still full of Halloween spirit! Frannie found a fun activity you can do, too - making a spooky, upcycled spider!


Here's what you need:
  • 2-liter plastic bottle
  • Black acrylic paint
  • Scissors
  • Glue
  • Googly eyes

What to do:
1. Clean out a 2-liter plastic bottle and remove labeling.


2. Pour black paint in the bottle, screw cap on, and shake the bottle until black paint has coated the entire bottle. This may be messy, so make sure the cap is on tight! When you're done, pour the excess paint out.


3. Let the paint dry overnight.

4. Cut the top of the bottle off and recycle.

5. Make legs for the spider by cutting the bottom of the bottle into 8 strips.


6. Bend the legs outward at the base of each strip.


7. Bend the legs inward about halfway down each strip.


8. Bend the legs inward again at the end of each strip.


9. Glue the googly eyes on your spider.


10. Decorate your house with your spooky spider!


Frannie wishes you a safe and fun Halloween!

Wednesday, October 2, 2019

It's Water-Wise Wednesdays with Frannie the Fish! {Upcycle: Toilet Paper Roll Bat Decorations}

It's finally October! Do you know what that means? Halloween is right around the corner!

You can make this Halloween fun and sustainable by upcycling a paper towel roll or toilet paper roll into one of Frannie's favorite spooky decorations: flying bats! Hang them in any room in your house and even outside, as long as they don't get wet!

Before you get started, you'll need to gather some supplies: toilet paper or paper towel rolls; black paint; white paint, googly eyes, or other eye-shaped stickers, the creepier the better; brushes; black paper; scissors; and glue. If you would like to make your bats look like they are flying at you, you will also need string and a hole punch.

If you're using a paper towel roll, you will need to cut it into three smaller pieces that are about the size of a toilet paper roll.

1. If you want to hang your bats from your door handle or tree limbs, start by punching 2 holes on either side of the roll and thread your string through.

2. Fold the ends of the empty toilet paper roll in together. You may need to secure the folds with glue.

3. Paint the roll black. While it's drying, cut out bat wings from the paper. You can cut the wings individually or as one whole piece. Either way, make sure to leave some space between the wings or a tab at the end of a wing so you can glue them to the back of the roll.

4. Once the glue is dry, bend the wings back just enough so that they stick out from bat.

5. Now it's time for the eyes. You can either glue on googly eyes, place the eye stickers. If you're painting the eyes, start by painting on small white ovals. When the white paint dries, dab a small circle of black paint for the pupils.

6. Display your bat where everyone can see!

Have a very Happy Halloween everyone!

Wednesday, May 2, 2018

It's Water-Wise Wednesdays with Frannie the Fish! {Upcycled Conservation Flowers}

Hooray! It's finally May! That means we've finally reached the time of year where the flowers, bushes, and trees are coming to life in beautiful and vibrant colors. This year, try planting some Upcycled Conservation Flowers to remind you of all the ways you can conserve water.
But wait a minute, Frannie: what in the world are Upcycled Conservation Flowers?
Upcycling is a fun trend that helps protect the environment by reusing items that may have previously been thrown away. Reusing an item keeps it from ending up in a landfill where it may take millions of years to decompose. Upcycled Conservation Flowers are made out of plastic water bottles and each petal represents an easy way to help conserve and protect groundwater! 
Find out how to make them below!
Students showing off their Upcycled Conservation Flowers!

Materials:

  • Empty plastic water bottle
  • 8 different colored acrylic paints
  • Paint brush
  • Hole punch
  • String
  • Wood stick (optional)
  • Glue
  • Sequins, beads, paper, glitter, or gems


Instructions:

  1. Clean your plastic water bottle. Remove any plastic labeling from the outside.
  2. Cut your water bottle in half. Recycle the bottom half of your bottle.
  3. Cut eight petals by cutting from the middle of the bottle towards the cap. Make sure to cut all the way to the edge of the cap. Round the edges.
  4. Press the petals out and flatten them to make your bottle look like a flower.
  5. Paint each petal a different color to represent the different ways to protect and conserve groundwater. Add glitter for fun!
  6. Cover the cap with beads, gems, sequins, paper, or paint to represent the pistil/stamen.
  7. Use a paper hole punch and string to make your flower an ornament or use a wooden stick and glue to create a decorative flower for potted plants.


Ways to Protect and Conserve Groundwater:

Go Native
Use native plants in your landscape. They look great, and don't need much water or fertilizer.
Reduce Chemical Use
Use fewer chemicals around your home and yard, and make sure to dispose of them properly - don't dump them on the ground!
Don't Let It Run
Shut off the water when brushing your teeth, and don't let it run while waiting for it to get cold. Keep a pitcher of cold water in the fridge instead!
Fix the Drips
Check all the faucets, fixtures, toilets, and taps for leaks and fix them right away.
Shower Smarter
Limit yourself to just a five minute shower, and challenge your family members to do the same!
Water Wisely
Water plants during the coolest parts of the day and only when they truly need it. Make sure you, your family and neighbors obey any watering restrictions.
Reduce, Reuse, and Recycle
Reduce the amount of "stuff" you use and reuse what you can. Recycle paper, plastic, cardboard, glass, aluminum, and other materials.
Learn More!
Get involved in water education! Learn more about groundwater by checking out The Groundwater Foundation's website www.groundwater.org/get-informed/.

Wednesday, December 13, 2017

It's Water-Wise Wednesdays with Frannie the Fish {#ThrowbackThursday with Holiday Upcycling: Toilet Paper Roll Wreaths }

It's that time of year again. ❆⛄🎄⛄🎄❆

Frannie's favorite things to do during this season are to drink hot chocolate and spend time with her family and friends decorating their trees, rooms, and homes.  

If you are having a hard time figuring out how to decorate your door this year, why don't you check out one of Frannie's all-time favorite upcycling activities from a couple years ago?  That's right, we're celebrating #tbt early with a wreath made out of paper towel and toilet paper rolls!

Don't forget to share with us at guardian@groundwater.org or on FacebookTwitter, and Instagram.  Happy decorating!

--

This Week's Project:
Toilet Paper Roll Wreaths
Frannie loves holiday wreaths! She thinks they are a neat way to add a festive touch to a room. Frannie loves that she can use her old toilet paper rolls to create beautiful wreaths for her home!

Materials:
  • 9 toilet paper rolls
  • scissors
  • green paint
  • small red circles (think buttons, construction paper, etc. Frannie used scraps of red foam)
  • glue
  • string or ribbon

Instructions:

  1. Collect 9 toilet paper rolls. You can also use 4 paper towel rolls or 1 wrapping paper roll. 
  2. Cut the toilet paper rolls into smaller pieces - about 3/4" wide. You'll need 5 smaller pieces to make one flower, and you'll need a total of 45 pieces to make 9 flowers. 
  3. Paint each piece green. 
  4. Arrange the pieces the way you would like them to look. You can use the photo as an example. Then, glue your pieces together. 
  5. Adorn your green wreath with red "berry" accents. You can use red buttons, red circles cut out from construction paper, or anything else you can think of! Place them around the wreath according to taste and glue them in place.
  6. Congratulations! You have just made an Upcycled Toilet Paper Roll Wreath! Hang it somewhere special to add a lovely holiday touch to a room.
For More Fun:

Add layers to your wreath! If you have extra toilet paper rolls, you can create more flowers to add more layers and dimension to your wreath. Get creative and have fun!

Wednesday, October 18, 2017

It's Water-Wise Wednesdays with Frannie the Fish! {DIY Halloween Bats}

Halloween is almost here!  Are you ready?  If not, it's easy! You can make your own bat decorations for any room in your house and even outside (as long as they don't get wet!) in just a few steps.

You'll need an empty toilet paper or paper towel roll, black paint, white paint or googly eyes or some other eye-sticker, brushes, black paper, scissors, and glue.  The string and the hole punch are optional if you are considering hanging your decorations from door handles or tree limbs.

Before beginning, if you're using a paper towel roll, you will need to cut it into three smaller pieces about the size of a toilet paper roll.

1. If you want to hang up your bats at the end, then you need to start by punching 2 holes on either side of the roll and thread your string through.  Then, fold the ends of the empty toilet paper roll in together.

2. Paint the roll black and, while it dries, cut out bat wings from the paper.  Make sure to leave a spot in the middle so you can glue the wings to the back of the roll. You're almost done!

3. Once the glue is dry, bend the wings back just enough so that they stick out from bat. At this point, you can either stick on your googly eyes or eye stickers or just dab on some white paint for the eyes.


 4. Hang your bat where everyone can see! Have a very Happy Halloween everyone!


P.S. You may have noticed that Frannie isn't here to do this craft with you today, but don't worry.  She's on her way to the Groundwater Foundation's 2017 National Conference in Boise, Idaho!  She is so excited to meet with groundwater professionals from all over the United States and share with you some stories about her adventures in a couple of weeks. See you then!


Wednesday, September 20, 2017

It’s Water-Wise Wednesdays with Frannie the Fish! {DIY Book Covers}

Hopefully by now, you have all of the books and textbooks you need for your classes.  The best way to protect your books and yourself from damage fines is to make sure they’re covered.  Most stores sell inexpensive, colorful elastic cloth covers, but you can create your own customized covers with paper grocery sacks.
You will need a book, brown paper grocery bag, and scissors.
Tape and markers or crayons are optional.
Let's Get Started!


1. Cut down one corner of the paper bag and take away the bottom.  If your bag has handles, cut those away too. You should now have a large, flat piece of brown paper. 

 2. Customize the fit by placing your book on top of the paper bag. Fold the bottom of the paper up against the bottom of the book and make a crease.  Do the same thing with the paper at the top of the book.  Remove the book fold inward along the creases for the whole length of the paper.
3. Center the book on the paper.  You can do this by placing your book roughly in the center of the paper and folding the ends inside the front and back covers. Trim the paper if it’s too long and adjust the ends until they’re evenly situated on the inside cover.


4. You’re almost done!  Feed one end of the folded paper down and around the inside covers so that the top and bottom of the book are hidden behind the paper. Keep pulling the paper down until it fits snugly around the book. If you need to, you can secure your cover by placing tap along the top and bottom edges.


5. Decorate!!!

Show your friends how to customize their own book covers and share them with us on our Facebook, Twitter, or Instagram pages for a chance to be featured in an upcoming blog!

Wednesday, December 14, 2016

It's Water-Wise Wednesdays with Frannie the Fish! {Holiday Upcycling: Coffee Can Decor}

Frannie was bummed that her favorite coffee containers were not recyclable. So she decided to upcycle them instead! There are so many different ways to use an upcycled coffee container. Frannie could make a vase, a storage place for pens and pencils, some lovely holiday decor, or even a cute container to wrap gifts in! This week Frannie is going to show you how to upcycle a coffee container!

Want to learn why Frannie is doing an upcycling project this week? Check out the Upcycled Clothing Pin Snowflake Ornament blog here.


Here's what you need:
  • A coffee can
  • Scissors
  • Glue
  • Craft supplies: ribbon, paint, sequins, glitter, stickers, etc.
Here's what you do:
1. Find an empty coffee can. You can choose to keep the lid or recycle the lid if possible. Frannie decided to recycle her lid since she won't be using it.


2. Decorate your coffee can! Use whatever craft supplies you have to decorate your coffee can. Frannie wrapped some string around her can to create a neat effect.


3. Once you like the way your coffee can looks, you are done! Congratulations! Go ahead and re-purpose your can as a vase, holiday decoration, storage container, or whatever you like like!


For more fun!
Add labels! Decorate several coffee cans and add a label to each describing what item you wish to store inside them.

Share photos of your upcycled coffee can decor here!

Frannie wishes you a fun and safe holiday season!