Wednesday, September 30, 2020

It's Water-Wise Wednesdays with Frannie the Fish! {TAPS Manual Part 6: Improperly Constructed Hydraulic Fracturing Wells}

 Frannie's friends at the Groundwater Foundation recently published the second edition of the Training About Protecting the Source (TAPS) Manual. The manual guides users through hands-on activities that explore potential threats to groundwater and challenges them to think about what can be done to protect this key drinking water source.

This manual can be used inside the classroom and is aligned to the national Next Generation Science Standards, but Frannie loves just learning about groundwater, no matter where she is. For the next few weeks, you can join her as she works through the different activities. 

Frannie will be using the Groundwater Foundation's Awesome Aquifer Kit, but if you don't have one, you can follow along with materials that might be found around your home. This is the second part of Frannie's exploration of the TAPS Manual. You can follow the link to see what she learned about improperly operated landfillssinkholesleaky underground storage tanksimproperly abandoned wells and the over-application of fertilizer.

Today's activity is....Improperly Constructed Hydraulic Fracturing Wells.
---

Hydraulic fracturing, commonly referred to as “fracking”, breaks up the ground deep beneath the surface in order to allow companies to more easily access oil and gas. The technique uses a mixture, or slurry, of water, chemicals, and sand and pumps it into the ground at a very high pressure. Fracking fluids can contain a variety of toxic chemicals such as diesel fuel, acids, and acetone. Grouting is the process of filling the spaces between the borehole, or the hole drilled during construction, and the well casing with an impermeable material like cement. Proper grouting and proper disposal of the fracking fluids can prevent these chemicals from leaching into the groundwater. 


For this activity, you will need:
  • Awesome Aquifer Kit
    • Plastic box
    • Gravel
    • Plastic tube
    • Hand pump or syringe
    • Nylon
    • Rubber band
  • Plastic bendable straw
    • Prepare the straw by trimming the longer end so that it's approximately 3 inches long. Poke several holes along the longer side with a pushpin to represent where the fracking fluid is expelled to release the natural gas.
  • A small cup (approximately 30 ml) of intensely colored water
  • 16 oz cup of water

Activity Steps 
1. Read through all the instructions first before you begin to build the model. Make sure you have all the needed materials and supplies.
 
2. Fill the plastic box with gravel until it is about ¼ full.
 
3. Add water so that half of the rocks are covered. (This will represent an aquifer.)
 
4. Create a hydraulic fracturing injection well by securely attaching the straw to the plastic tube with a rubber band. Secure the well screen (piece of nylon) to the end of the straw with an additional piece of rubber band. You may have to cut a small slit at the short end of the straw in order to get it to roll in on itself and slide into the tubing.

5. Place your hydraulic fracturing injection well on top of the gravel. Add more gravel until the box is about ½ full.
 
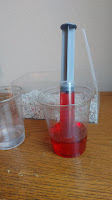
6. Fill the syringe full of the intensely dyed water, which represents fracking fluid. Attach the full syringe to the well. 
 

7. Pump the fluid into your aquifer by pushing on the plunger. Observe what happens to the fracking well and the water around it.
 

Frannie noticed that the toxic fracking fluid was escaping out of the poorly sealed section between the well casing and the injection casing. Proper grouting could have contained the chemicals better, allowing it to be pumped out with the rest of the fluid once the hard rock layer had been sufficiently broken up. If she had properly sealed and grouted her well with cement or bentonite clay, which could be represented by the modeling clay included in the Awesome Aquifer Kit, she could have prevented this dangerous contamination.

Wednesday, September 16, 2020

It's Water-Wise Wednesdays with Frannie the Fish! {World Water Monitoring Day}


Frannie will be back in two weeks with the last installment of the TAPS activities, but she didn't want to miss sharing World Water Monitoring Day with you!

World Water Monitoring Day is celebrated on September 18th and is different that World Water Day (which we celebrate on March 22). The first World Water Monitoring Day was in 2003 when America's Clean Water Foundation created a challenge to empower individuals to monitor their local water bodies. In 2015, the challenge was taken on by EarthEcho International. 

Now, with a simple test kit and an account on the EarthEcho Water Challenge app, you and your friends can join over 1.6 million people in 146 counties world wide in learning about and protecting our water sources.

Joining online or via the mobile app is easy and you can create an account with Google or Facebook. Once you have an account, you can start monitoring your local creeks, rivers, ponds, lakes, and more! The database allows you to add important water quality information, pictures of the site, and information about the citizen scientists (that's you!) who collected the data.


You can collect data all year long, as long as you can access the liquid water in your area. Just remember to follow the water safety rules, which you can find on The Groundwater Foundation's website.

Be safe and Happy World Water Monitoring Day!


Wednesday, September 2, 2020

It's Water-Wise Wednesdays with Frannie the Fish! {TAPS Manual Part 5: Improperly Operated Landfills}

Frannie's friends at the Groundwater Foundation recently published the second edition of the Training About Protecting the Source (TAPS) Manual. The manual guides users through hands-on activities that explore potential threats to groundwater and challenges them to think about what can be done to protect this key drinking water source.


This manual can be used inside the classroom and is aligned to the national Next Generation Science Standards, but Frannie loves just learning about groundwater, no matter where she is. For the next few weeks, you can join her as she works through the different activities. 

Frannie will be using the Groundwater Foundation's Awesome Aquifer Kit, but if you don't have one, you can follow along with materials that might be found around your home. This is the second part of Frannie's exploration of the TAPS Manual. You can follow the link to see what she learned about sinkholesleaky underground storage tanksimproperly abandoned wells and the over-application of fertilizer.

Today's activity is....Improperly Operated Landfills.
---

A municipal solid waste landfill (MSWLF) is an area of land that typically receives household waste and sometimes can receive other types of nonhazardous waste, such as commercial solid waste, nonhazardous sludge, and industrial nonhazardous solid waste. According to the EPA, there are approximately 2,000 MSWLFs in the U.S. that are managed by the states in which they are located. When rain, snow, or runoff water soaks into and through a landfill, it can dissolve some of the landfill’s contents and, in an improperly constructed or operated landfill, carry it on down to the groundwater. This mixture of recharge and particles from the landfill’s contents is called leachate. As the amount of waste increases, the potential for leachate to enter the groundwater increases.

For this activity, you will need:
  • Awesome Aquifer Kit
    • Plastic box
    • Gravel
    • Plastic tube
    • Hand pump or syringe
    • Nylon
    • Rubber band
  • 2 inch square piece of dyed paper towel (prepped in advance)
    • Dip a paper towel in/or spray with slightly diluted food coloring (2 drops of dye per ounce of water)
    • Allow to dry completely.
  • 16 oz cup of water

Activity Steps 
1. Read through all the instructions first before you begin to build the model. Make sure you have all the needed materials and supplies.
 
2. Fill the plastic box with gravel until it is about ¼ full.
 
3. Add water so that half of the rocks are covered. (This will represent an aquifer.)
 
4. Create a well by covering the end of the plastic tube with nylon, securing it with a rubber band.

 5. Insert the well, with the well screen on the bottom, near one corner of the plastic box. Push the well down so that it reaches the bottom of the model.
 
6. Take the colored piece of paper towel, scrunch it up, and bury it on the opposite side of the model from the well location and near the outside of the box. (This is your landfill.)  
 
7. Pour or spray water on the surface of the gravel to simulate rain. Observe what happens to the landfill and groundwater after the rain.

8.  Pump the well by inserting the tip of the syringe into the well (plastic tube) or attaching and pumping the hand pump.


Once it got wet, the stained paper towel began to leach some red into the surrounding groundwater. Frannie also noticed that the water she pumped out of the other end of the model was colored a light pink. Leachate from improperly managed landfills can flow in underground plumes, eventually contaminating nearby wells, but this can be prevented. Landfills that are properly operated have safety measures in place to mitigate the chances that dangerous chemicals will enter into the ground. Proper recycling of hazardous waste, such as pharmaceuticals, paint, oil, cleaners, electronics, batteries, and more can keep contaminants from getting into the system in the first place.