Showing posts with label activity. Show all posts

Wednesday, December 9, 2020

It's Water-Wise Wednesdays with Frannie the Fish! {Upcycled Clothes Pin Snowflake Ornament}

Tis the season for repurposed or upcycled decorations! Frannie loves upcycling because it takes something that would normally be thrown away and makes it new and usable again. Upcycling is a great way to reduce our waste and conserve water! 

How does upcycling reduce waste and conserve water? 

Upcycling reduces the need to use new, raw materials when making a new product. By using old materials instead of new materials, less energy and water is used. Even better, air pollution and water pollution are reduced!

Upcycled Clothing Pin Snowflake Ornament:


Frannie was looking through her home for fun items to upcycle when she came across some broken clothing pins. With some creativity (and the help of Pinterest), Frannie decided to make a snowflake ornament out of her broken clothing pins!

What You Need:

  • 8 clothing pins (or 16 halves of clothing pins)
  • white paint
  • paint brush
  • glue
  • string
Instructions:
  1. Gather together your 8 clothing pins. You'll need both halves of each clothing pin for a total of 16 pieces. 
  2. Paint each clothing pin white. 
  3. Glue the clothing pin halves together as shown in the photo. You should end up with 8 snowflake pieces. Thread a string through the hole in one piece. 
  4. Glue four snowflake pieces together into a "+" shape as shown in the photo. 
  5. Glue the final four snowflake pieces into the corners of the already glued pieces, making sure the snowflake piece with the string is located where you would like the "top" of your snowflake to be. 
  6. Congratulations! You have just made an Upcycled Clothing Pin Snowflake Ornament! Hang it up as a winter decoration or wrap it up to give as a gift.
For More Fun:

Get creative! Add color to your snowflake or a touch of glitter. Write a special message on it or have all your family sign their names on it. Have fun!

Share:

Share pictures of your family and your snowflakes with us on Facebook, Twitter, Instagram, or by sending them in to info@groundwater.org. Happy Holidays!

Wednesday, April 29, 2020

It's Water-Wise Wednesdays with Frannie the Fish! {Make Your Own Rain Gauge!}

April showers bring May flowers and it's certainly been sprinkling around Frannie's pond! Rain gauges are an excellent way to measure how much precipitation your outdoor plants are receiving and help save you money so you only water your lawn and garden when needed.

Here's how you can make your own. To start, you'll need:
  • A plastic bottle with a flat bottom
  • Scissors 
  • A ruler
  • A permanent marker
  • Stickers (optional)

Here's what you do:
1. Begin by removing all the labeling and cleaning the plastic bottle.


2. Take the scissors and the cut off approximately the top third of the bottle.


3. Flip the top third of the bottle upside down and insert it into the plastic bottle.


4. Using the ruler, mark 1/4", 1/2", and 1" increments starting from the bottom of the plastic bottle. For more fun, use stickers and markers to decorate your rain gauge.


5. Place your rain gauge outside. You can use twine to tie it to a post, bury it, or use another method to ensure it stays upright.


6. Check your rain gauge after a storm to see how much rain has fallen.

Take a picture of your rain gauge and share it with Frannie at hydro@groundwater.org!

Wednesday, December 25, 2019

It's Water-Wise Wednesdays with Frannie the Fish! {Upcycled Reindeer}

Happy holidays to one and all!

Frannie loves making holiday crafts with her friends and this year, they decorated their homes with upcycled toilet paper roll reindeer. It's so simple that all you need is a toilet paper roll (or a paper towel roll cut in half), a pencil or pen, and a pair of scissors.

To make your reindeer extra fancy, you can also get a red button or cotton ball to be glued on as a nose, sticker or googly eyes, and crayons or markers. Be creative!


Start by squishing the toilet paper tube flat. Lightly draw lines, as seen below, that you will then cut along to form the antler and legs of the reindeer.


Cut out the legs completely, making sure you cut through both sides of the roll. Next, cut along the top line, making sure you cut through both sides of the roll. Separate your antlers by cutting the top of the tube along the crease, as shown below.


Now it's time to shape the antlers. First, take one of the antlers and make a twist inward so that the antler points forward. While holding the first twist in place, make a second twist so that the antler is now pointing towards the tail of the reindeer. Repeat with the second antler.


Fold the cut edges below the antlers down so that one side covers the other. Now that you've finished the body of the reindeer, you can decorate it any way you'd like! Frannie wanted to make Rudolph so she colored him in with brown crayons, drew on eyes, and gave him a nose with a bright red cotton ball.


Have a great holiday, everyone! See you in the new year!

Wednesday, November 27, 2019

It's Water-Wise Wednesdays with Frannie the Fish! {What-A-Cycle!}

See below for a special announcement!
***
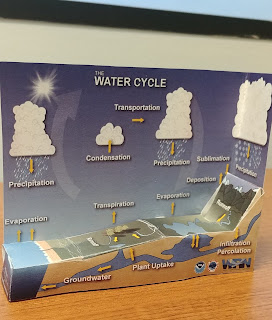
A week ago, Frannie was in Cincinnati meeting with science educators and curriculum developers for the National Science Teaching Association regional conference. While she was there she met Dennis, a climate scientist from National Oceanic and Atmospheric Administration (NOAA), who was handing out a water cycle modeling activity called "What-A-Cycle"!

Frannie thought the idea was so clever but she knew she wouldn't have the time do it because she had to get ready for Groundwater Week. She reached out to her friends at the Groundwater Foundation, knowing we'd be excited to share this craft with you today.


WHAT-A-CYCLE Water Cycle Paper Craft
You'll need:


STEPS:
1. If you printed out a Black and White copy or an unlabeled copy of the What-a-cycle paper craft worksheet, you should first color it and label all the parts of the water cycle.

2. Cut out the atmospheric portion of the water cycle and then cut out the ground portion of the water cycle. You should now have 2 separate pieces.

3. Fold the lettered tabs and along the marked lines on the ground piece and start to form a 3-D version of the groundwater and runoff portions of the water cycle. Once you start to see how the flat version transforms into 3-D, glue or tape the tabs together to form the model.

4. Fold along the dotted line in the atmospheric portion of the water cycle so that the largest precipitation cloud is at a right angle to the rest of the background.

5. Glue or tape the 3-D groundwater portion of the model to the atmospheric section of the model to complete the activity.


Frannie has been blogging about the water cycle a lot these past couple months.Go back to review her water cycle blogs first, and then trace as many paths a water droplet can take as you can find. What parts of the water cycle deep dives are shown in this model? What parts are missing?

Let her know by email or through Facebook, Twitter, or Instagram.

Special Announcement!!
Catch Frannie next week on Facebook in a very special addition of "Water-Wise Wednesdays" as she completes the Groundwater Foundation Scavenger Hunt in the Groundwater Week Exhibit Hall! Frannie is excited to introduce you to several companies who make it possible for her (and her friends at the Groundwater Foundation!) to share the importance of groundwater through education.